Electron Menu
Menu
この章では、Electron のメニューについて説明します。
今回は、IPC通信を使います。
Linux については、Ubuntu、Fedora、CentOS、Mint で正常に動作しますが、Debian では動作しません。
ディレクトリの作成
Electronは、一つのアプリケーションを、一つのディレクトリにまとめて管理していきます。 コマンドプロンプトかターミナルを起動して次のようにコマンドします。
// Documents ディレクトリなどに Electron 用のディレクトリなどを作り
// その中に RadioButton アプリケーション用のディレクトリを作ります。

cd Documents
mkdir Electron
cd Electron
mkdir Menu
cd Menu

// Menu ディレクトリに設定ファイルを作り、Electron と Electron-Builder をインストールします。

npm init -y
npm i -D electron
npm i -D electron-builder

// i は install の略記、-Dは --save-dev の略記です。-D もしくは --save-dev は、パッケージをそのディレクトリだけにインストールします。
// なお electron-builder は、アプリケーションをビルドするときに使います。
アイコンの準備
PNG形式のアイコンを自作するか、 次のサイトなどから PNG 形式のアイコンをダウンロードします。 大きさは 512px などの一番大きなものが良いでしょう。
自作した、もしくはダウンロードした PNG ファイルを Menu ディレクトリに入れます。
Electron は、PNG 形式のアイコンを、そ れぞれの OS に適した形式に自動的に変換してくれます。
package.json の編集
package.json を次のように編集します。
package.json
{
  "name": "Menu",
  "version": "1.0.0",
  "description": "I am Menu",
  "main": "index.js",
    "scripts": {
	"start": "electron ."
  },
  "keywords": [],
  "author": "viva Cocoa",
  "build": {
      "win": {
          "target": "nsis",
          "icon": "clover.png"
      },
      "mac": {
          "target": "dmg",
          "icon": "clover.png"
      },
      "linux": {
          "target": "AppImage",
          "icon": "clover.png"
      }
  },
  "license": "ISC",
  "devDependencies": {
    "electron": "^13.1.4",
    "electron-builder": "^22.11.7"
  }
}
コード説明
- description と author に何か記述しなければ、ビルド時にエラーになります。
- build 項目はどこに記述しても正常に機能しますが、 一応 author 項目の次に記述することになっているみたいです。
-
Windows と macOS と Linux の build 項目を記述しましたが、
次のように必要なプラットフォーム (OS) だけでも大丈夫です。
・・・
 "author": "viva Cocoa",
 "build": {
	"win": {
	    "target": "nsis",
	    "icon": "clover.png"
	}
 },
  "license": "ISC",
  ・・・
それぞれの target は省略することもできますが、省略するとサポートされている、
いろいろなインストーラが作成されてしまいます。
- icon のところは、あなたが PNG ファイルにつけた名前にします。 icon 項目を省略するとエラーになるみたいです。
index.js の追加
Menu ディレクトリに次の index.js を追加します。 今回は、IPC 通信を使っています。
index.js
const { app, dialog, BrowserWindow, Menu } = require('electron');

let window;
let menuTemplate = [
    {
    label: 'Menu',
    submenu: [
        {label: 'About', accelerator: 'CmdOrCtrl+Shift+A', click: () =>
            { dialog.showMessageBox({
                type: 'info',
                buttons: ['OK'],
                message: 'About This App',
                detail: 'Menu ver. 1.0.0'
                });
            }
        },
        {type: 'separator'},
        {label: 'Quit', accelerator: 'CmdOrCtrl+Q', click: () =>
            { app.quit(); }
        }
    ]},
    {
    label: 'RGB',
    submenu: [
        {label: 'Red', accelerator: 'CmdOrCtrl+R', click: () =>
            { window.webContents.send('change-color', 'Red'); }
        },
        {label: 'Green', accelerator: 'CmdOrCtrl+G', click: () =>
            { window.webContents.send('change-color', 'Green'); }
        },
        {label: 'Blue', accelerator: 'CmdOrCtrl+B', click: () =>
            { window.webContents.send('change-color', 'Blue'); }
        }
    ]},
    {
    label: 'CMYK',
    submenu: [
        // Windows と Linux の場合、Cyan については、CmdOrCtrl+Shift+C とすること
        // Copy と衝突して機能しないみたい
        {label: 'Cyan', accelerator: 'CmdOrCtrl+C', click: () =>
            { window.webContents.send('change-color', 'Cyan'); }
        },
        {label: 'Magenta', accelerator: 'CmdOrCtrl+M', click: () =>
            { window.webContents.send('change-color', 'Magenta'); }
        },
        // Linux の場合、Yello につていも CmdOrCtrl+Alt+Y とすること
        // Ctrl+Y も Ctrl+Shift+Y もすでに何かに割り当てられているみたい
        {label: 'Yellow', accelerator: 'CmdOrCtrl+Y', click: () =>
            { window.webContents.send('change-color', 'Yellow'); }
        },
        {label: 'Black', accelerator: 'CmdOrCtrl+K', click: () =>
            { window.webContents.send('change-color', 'Black'); }
        }
    ]}
];
let menu = Menu.buildFromTemplate(menuTemplate);

app.on('ready', () => {
    Menu.setApplicationMenu(menu);
    window = new BrowserWindow({
	width: 400,
	height: 200,
	webPreferences: {
	    nodeIntegration: true,
	    contextIsolation: false
	}
    });
    window.loadFile('index.html');
    //window.webContents.openDevTools();
});
window.webContents.openDevTools(); をコメントアウトしていますが、 開発時にはこれを機能させておくと、Chrome のデベロッパツールと同じものがウィンドウに 表示されて、エラー箇所を指摘してくれるので大変便利です。
index.html の追加
Menu ディレクトリに次の index.html を追加します。
index.html
<!DOCTYPE html>
  <html lang="ja">
    <head>
      <meta charset="utf-8">
      <title>Menu</title>
      <style type="text/css">
	body {
	    color: gray;
	    background: black;
	}
	.middle {
	    position: absolute;
	    top: 0;
	    right: 0;
	    bottom: 0;
	    left: 0;
	    margin: auto;
	    height: 4.0rem;
	}
      </style>
    </head>
    <body>
        <div class="middle" align="center">
          <h2 id="colorname">Black</h2>
		</div>
      <script>
      'use strict'
      const ipc = require('electron').ipcRenderer;
      const name = document.getElementById('colorname');
      ipc.on('change-color', (event, color) => {
          document.body.style.backgroundColor = color;
          name.innerText = color;
      });
      </script>
    </body>
  </html>
CSS の middle クラスは、テキストをウィンドウの上下の中央に表示するためです。
実行
コマンドプロンプトもしくはターミナルに次のようにコマンドして簡易的に実行できます。
npm start
実行結果
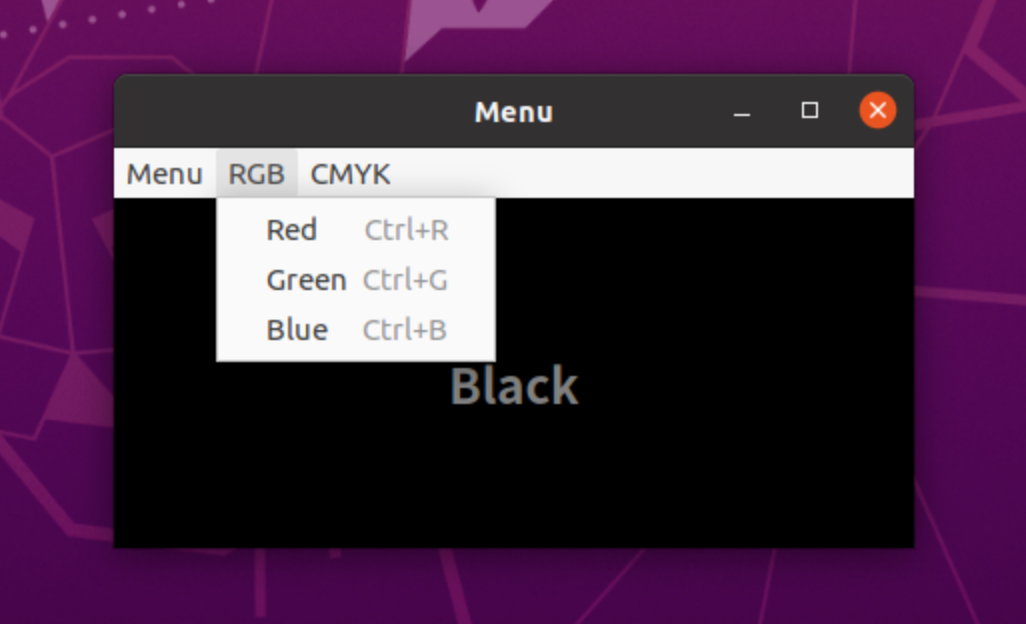
npm start の時点では Menu のところは Electron になります。ビルドすると、 Menu と正しく表示されます。
メニューを変更するたびに、ウィンドウの色が変わります。
ウィンドウの大きさを変更しても <h2> は常に中央に表示されます。
アバウトボックスも表示されます。
ビルド
コマンドプロンプトもしくはターミナルを起動して、 それぞれの OS 上で次のようにコマンドします。
// Windows 32bit の場合
npx electron-builder --win --ia32

// Windows 64bit の場合
npx electron-builder --win --x64

// macOS の場合
npx electron-builder --mac --x64

// Linux の場合
npx electron-builder --linux --x64

// はじめのコマンドは npm ではなく、npx です。注意してください。
// なお、macOS の場合、次のようにコマンドして、一度にすべてのプラットフォームのインストーラを作成することもできます。
npx electron-builder -wml
インストール
Windows の場合
作成された dist ディレクトリの中の Menu Setup 1.0.0.exe をダブルクリックするとインストーラが起動します。
このインストーラでインストールした Menu アプリケーションは、 コントロールパネルのプログラムのアンインストールで、 安全にアンインストールすることもできます。
dist ディレクトの中の win-ia32-unpacked もしくは win-x64-unpacked の中の Menu.exe をダブルクリックしても Menu アプリケーションは起動しますが、 この実行ファイルを他の場所へ移動させた場合は、DLL エラーで起動できません。
macOS の場合
作成された dist ディレクトリの Menu-1.0.0.dmg をダブルクリックして、 インストーラを起動します。インストール方法は通常どおりです。
また、dist ディレクトリの中の mac ディレクトリの中に作成された実行ファイルをそのまま使うこともできます。
この実行ファイルは、Windows の場合と違って、どこへ移動させても正常に動作します。
Linux の場合
Linux の場合は、ビルドし他だけではアプリケーションにアイコンは付きません。 アイコンを付けるには別の作業が必要になります。ただし、package.json にアイコンを指定しておかないとビルド時にエラーになります。
作成された dist ディレクトの Menu-1.0.0.AppImage はどこへ移動させても起動できます。ただし名前を変更すると起動できなくなります。
dist ディレクトリの中の linux-unpacked の中の menu 実行ファイルは ダブルクリックしても起動しません。ターミナルで ./menu とコマンドすると起動できます。
Linux でアプリケーションにアイコンを付ける方法
次の場所にMenu-1.0.0.AppImage とアイコンファイルを移動もしくはコピーします。
/home/ユーザー名/.local/share/applications
applications ディレクトリに次の menu.desktop ファイルを作成します。
menu.desktop
[Desktop Entry]
Type=Application
Version=1.0
Name=Menu
Exec=/home/ユーザー名/.local/share/applications/Menu-1.0.0.AppImage
Icon=/home/ユーザー名/.local/share/applications/clover.png
Comment=I am Menu
Categories=
コード説明
- Version は、Menu-1.0.0.AppImage のバージョンではなく、1.0 としておきます。 もしくは記述しなくても大丈夫です。
- Comment は、Name と同じ文字列にすることはできません。
- Categories を指定しない場合は、「その他」に分類されます。
- 次のコマンドで menu.desktop に間違いがないか確認できます。
desktop-file-validate menu.desktop
何も表示されなければエラーはありません。 - menu.desktop は、すぐに有効になる Linux もあれば、 再ログイン後に有効になる Linux もあります。
- アクティビティなどで検索すると Hello アプリケーションがアイコン付きで表示されます。
システム全体に登録する方法
上記の方法は、ユーザ専用に Menu アプリケーションを登録する方法です。 システム全体 (全ユーザが使えるよう) に登録する場合は次のようにします。 ユーザ専用とシステム全体の両方がある場合は、ユーザ専用が優先されます。
-
Menu-1.0.0.AppImage は
/usr/bin
にコピーするか移動します。 -
アイコンファイルは
/usr/share/icons/hicolor/scalable/apps
にコピーするか移動します。 -
menu.desktop は
/usr/share/applications
に作成します。
そして、menu.desktop には、次のように記述します。
menu.desktop
[Desktop Entry]
Type=Application
Version=1.0
Name=Menu
Exec=Menu-1.0.0.AppImage
Icon=clover.png
Comment=I am Menu
Categories=
/usr/bin と
/usr/share/icons/hicolor/scalable/apps
には、システムによってパスが通っていますので、ファイル名だけで OK です。