X11 wxGTK3 トグルボタン
wxGTK3
CentOS 7 では、wxGTK までしかインストールできませんでしたが、CentOS 8 では wxGTK3 がインストールできます。その結果、GUI のデザインが少し新しくなります。
Development Tools のインストール
CentOS でアプリケーションの開発する場合は Develpment Tools をインストールしておくと何かとうまくいく場合が多いみたいです。 まだの方は一応インストールしてみてください。
sudo dnf groupinstall "Development Tools"
wxGTK3 のインストール
sudo dnf install epel-release

sudo dnf --enablerepo=epel install wxGTK3 wxGTK3-devel

// インストールされたか確認します
wx-config --version
3.0.4
ToggleButton アプリの作成
実際にアプリケーションを作っていきます。
wxWidgets はアプリケーションのリソースをディレクトリにまとめなければならい というような制限はありません。ソースファイルを記述する場所はどこでも構わないでですが 私はホームディレクトリに Documets というディレクトリを作り、その中に wx というディレクトリを作り、 その中にソースを記述しました。
次の togglebutton.cpp を記述して保存してください。
togglebutton.cpp
#include <wx/wx.h>
#include <wx/tglbtn.h>

class ToggleButton : public wxFrame
{
public:
    ToggleButton();
    void OnToggleRed  (wxCommandEvent & event);
    void OnToggleGreen(wxCommandEvent & event);
    void OnToggleBlue (wxCommandEvent & event);
    void OnQuit(wxCommandEvent & event);
protected:
    wxToggleButton *redbutton;
    wxToggleButton *greenbutton;
    wxToggleButton *bluebutton;
    wxPanel        *colorpanel;
    wxColour       *color;
    wxButton       *quit;
};

class App : public wxApp
{
public:
    virtual bool OnInit();
};

ToggleButton::ToggleButton() : wxFrame(NULL, -1, "ToggleButton")
{
    wxPanel *panel = new wxPanel(this, -1);
    redbutton      = new wxToggleButton(panel, 101, "Red",
                                        wxPoint(20, 20));
    greenbutton    = new wxToggleButton(panel, 102, "Green",
                                        wxPoint(20, 70));
    bluebutton     = new wxToggleButton(panel, 103, "Blue",
                                        wxPoint(20, 120));
    colorpanel     = new wxPanel(panel, -1, wxPoint(150,20),
                                 wxSize(120, 120),
                                 wxSUNKEN_BORDER);
    color          = new wxColour(0, 0, 0);
    colorpanel->SetBackgroundColour(color->GetAsString());
    quit           = new wxButton(panel, wxID_EXIT, "Quit",
                                    wxPoint(20, 190));

    Connect(101, wxEVT_COMMAND_TOGGLEBUTTON_CLICKED, wxCommandEventHandler(ToggleButton::OnToggleRed));

    Connect(102, wxEVT_COMMAND_TOGGLEBUTTON_CLICKED, wxCommandEventHandler(ToggleButton::OnToggleGreen));

    Connect(103, wxEVT_COMMAND_TOGGLEBUTTON_CLICKED, wxCommandEventHandler(ToggleButton::OnToggleBlue));

    Connect(wxID_EXIT, wxEVT_COMMAND_BUTTON_CLICKED,
    wxCommandEventHandler(ToggleButton::OnQuit));
}

void ToggleButton::OnToggleRed(wxCommandEvent & event)
{
    unsigned char green = color->Green();
    unsigned char blue  = color->Blue();
    if (color->Red())
    {
        color->Set(0,   green, blue);
    } else {
        color->Set(255, green, blue);
    }
    colorpanel->SetBackgroundColour(color->GetAsString());
    Refresh();
}

void ToggleButton::OnToggleGreen(wxCommandEvent & event)
{
    unsigned char red   = color->Red();
    unsigned char blue  = color->Blue();
    if (color->Green())
    {
        color->Set(red, 0,   blue);
    } else {
        color->Set(red, 255, blue);
    }
    colorpanel->SetBackgroundColour(color->GetAsString());
    Refresh();
}

void ToggleButton::OnToggleBlue(wxCommandEvent & event)
{
    unsigned char red   = color->Red();
    unsigned char green = color->Green();
    if (color->Blue())
    {
        color->Set(red, green, 0  );
    } else {
        color->Set(red, green, 255);
    }
    colorpanel->SetBackgroundColour(color->GetAsString());
    Refresh();
}

void ToggleButton::OnQuit(wxCommandEvent & event)
{
    Close();
}

IMPLEMENT_APP(App)

bool App::OnInit()
{
    ToggleButton *togglebutton = new ToggleButton();
    togglebutton->Center();
    togglebutton->Show();
    return true;
}
wxGTK3 では文字列を wxT() で囲む必要がなくなりました。
togglebuton->Center(); は、
wxGTK でもこの書き方で良かったみたいです。
コンパイルと実行
wxWidgets には簡易的に実行する方法はありません。必ずビルどしてから実行します。
// コンパイル(ビルド)
g++ togglebutton.cpp `wx-config --cppflags --libs` -o togglbutton

// ` は '(シングルクォーテーション)とは違います。US キーボードなら ~(チルダ)と同じキーです。
// JIS キーボードの場合は、@キーと同じキーです。
// wxWidget の場合は、ビルド時にコードエラーが表示されます。

// X11 で実行するには次のようにします
./togglebutton & X -retro
実行画面

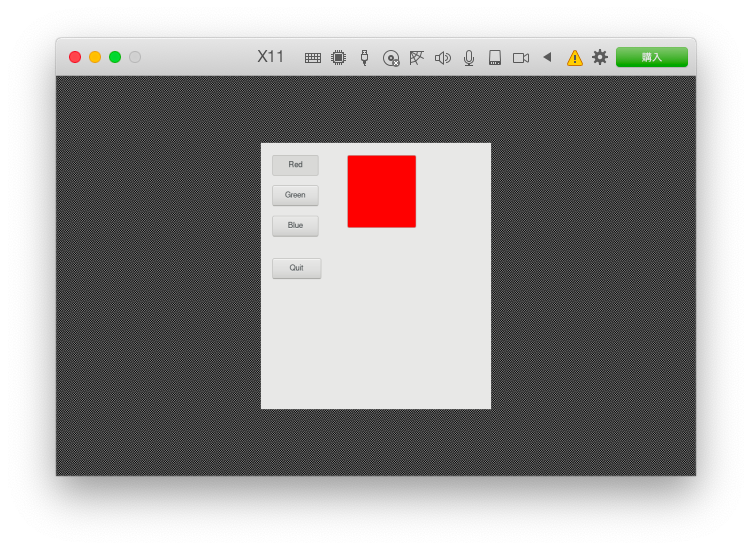
wxGTK3 では、ボタンなどのデザインが変わりました。ウィンドウの大きさは 指定していないので、アプリケーションが適当な大きさにしています。 X11 ではウィンドウのフレーム(タイトルバーやリサイズする機能)はつきません。 Quit ボタンをクリックすると ToggleButton アプリが終了します。
X11 の終了
、 X11 を終了するには次のようにします。
// 次のコマンドで X11 の画面が閉じます
 Ctrl + Alt + F1

 // F1 のところは、X11 を起動したコンソールの番号に合わせて、F1、F2、F3 と変えていきます
 // ほとんどの場合、コンソール番号 1 からの起動なので、F1 にしました
// 画面は閉じても X11 のタスクは起動したままです。
// 次のコマンドで X11 は完全に終了します
Ctrl + C
補足
ToggleButton 実行ファイルをルートディレクトリの /bin ディレクトリに入れると、togglebutton & X -retro だけで起動できるようになります。しかし、
/bin ディレクトリにどんな名前の実行ファイルがあるかはっきりしない場合は、
うっかりと上書きしてしまう場合がありますので、あまりおすすめしません。